Wednesday, December 31, 2014

Little Red Wagon Challenge #270 ~ HAPPY NEW YEAR!!!!

Hello there and welcome to my last post for the year and our last challenge of 2014 at Little Red Wagon.  First, I want to say a big THANK YOU to the girlfriends for allowing me to become part of their team this year and second, a big THANK YOU to those of you who have joined our challenges and made them a success.  So, as we welcome in 2015, our hostess is Tracy and her challenge is "HAPPY NEW YEAR!" ~ create a project with a New Year's theme.

In my mind I had the perfect project to share for New Year's ~ the reality is not exactly what I expected but it is a work in progress.  Many of my friends were getting these incredible planner/organizers for the new year.  I, unfortunately, was unable to afford a snazzy new one and decided to try my hand at taking a plain, ordinary composition book and altering it into a planner. I spent a lot of time watching YouTube videos on the subject (this was not an original idea by any means), and making it my own ~ deciding on the categories I wanted and what would work for me.  I have completed the cover, a couple of pockets and the monthly planning section.  I still need to decide what I am using for divider tabs.  I am thinking I will just go to the dollar store and get a set of tabs to add to the pages I have covered with card stock.  Like I mentioned, a work in progress!  All of the supplies were from my endless stash as there was a freeze on my crafting budget these last few months.


 This is the cover,  I covered  it with paper and inked heavily around the edges to hide all the little cutting marks.  I punched a hole through the back cover and added a hair tie.  I put the buttons on loosely and viola, a closure. The initials are stickers.  Ribbon and a bow finish it off,  I may add a coloured image sometime if I find the right one.


Here is the inside cover.  I added a square pocket to the front and also the back cover to put any little notes in.  


This is the next page.  It is card stock on one side and a pocket on the other.  I am thinking I may add some quotes or favourite pictures to it.  I am putting one of these between each section of the planner. I am still deciding on the sections I need that I will use the most.  I thought I had it and then looked up planner dividers and there are so many sections you can make.  I want ones that I will actually use.  


Here are the monthly pages.  I did not bore you with all twelve but they all look exactly the same except for the backing card stock.  Each month is on a different colour and they make up a rainbow.  The actual calendar pages were about 60 cents and I just cut them off the spiral they were on and trimmed the edges.  

So far this planner has cost me about $5.00 total with the cost of the book, calendar and card stock.  I will show you this work in progress as I continue to add to it.  If you have any suggestions for "must have" sections in your planner, let me know.  All are welcome.

Thanks for coming by today.  I want to wish each and every one of my readers a very HAPPY NEW YEAR.  Thank you for all the support this year and I hope you will continue to visit my little crafting corner in 2015.  And don't forget to join us at Little Red Wagon up until Tuesday, January 6, 2015, with your project for the new year.  

{{{{{HUGS}}}}}, Heather

Thursday, December 25, 2014

MERRY CHRISTMAS!!!!!!


"For unto us a Child is born,
Unto us a Son is given."
Isaiah 9:6

Merry Christmas to all of my family and friends who continue to support me and never fail to encourage me in my creative endeavors.  May you have a blessed day today and remember the reason we celebrate.

{{{{{HUGS}}}}}, Heather

Wednesday, December 24, 2014

Little Red Wagon Challenge #269 ~ Birthday

WOW! ~ Christmas Eve already and no matter what you are doing, whether it is last minute shopping, baking or getting the house ready for company I pray you are having a blessed day.

Today starts a new challenge at Little Red Wagon and our hostess is  Jan.  Her challenge is HAPPY BIRTHDAY ~ a nice change from all of our Christmas crafts (although I do love them!) We can all use birthday cards in our stash for when that unexpected birthday pops up, right?

My card uses a cute image from Your Next Stamp and also uses some of my fave colours of pinks and teals.


RECIPE:
Copic Xpress It Card Stock
Memento Tuxedo Black Ink
Image and Sentiments ~ Your Next Stamp Martini Birds
Copic Markers
Card Stock ~ Recollections
Patterned Paper ~ Authentique Seasons:Spring
Happy Birthday Sentiment ~ My Pink Stamper Everyday Occasions
Tim Holtz Teay Dye Distress Ink
Glossy Accents
Flower, Twine, Button, Pearls ~ all from my (too) immense stash

So, on a totally different, and personal note, I knew that many of the ladies on the Little Red Wagon team were from my area but had only met one a few times (Tracy).  On Saturday I was able to make that two.  I ran into Joanne at my job and recognized her from the pictures I had seen of her.  I introduced myself and talked for a few minutes although it was a busy place.  It is so nice to put a face to a name and I do know I will see her again and hopefully meet another member of the team at the same time as well.  

Thanks for stopping in today.  Enjoy this special time of the year and join us this week at Little Red Wagon for our HAPPY BIRTHDAY challenge.

{{{{{HUGS}}}}}, Heather

I would like to enter this card into the following challenge:
Your Next Stamp Challenge #4 ~ Sketch and Colour Challenge (I combined both)


Wednesday, December 17, 2014

Little Red Wagon Challenge #268 ~ Anything CHRISTMAS!!!!

Hello there.

Glad you could drop by once again on a Wednesday, a new challenge day at Little Red Wagon.  Our hostess this week is Carolyn and her challenge is "ANYTHING CHRISTMAS!"

Wow, how super easy is that as we all put the last minute touches on things we want to do for Christmas.  I am off today from my very busy retail job and am going to put the last minute touches on a bit more shopping and then I am done.

For my Christmas project, I made two of these super cute treat/gift card holder combination that I got the instructions for HERE.  As I show them to you they are winging their way to British Columbia and are hopefully arriving before Christmas.  They were fun to make and fill.


RECIPE:
Card Stock ~ Recollections
Patterned Paper ~ Echo Park Winter Park
~ MME Merry
Sentiments ~ Michaels $1.50 Bin
Versamark Ink
Stampendous White Embossing Powder
Ribbon ~ Use It Up Inventory

Thanks for coming by.  Don't forget to visit the other girlfriends and see what they have made and then link up your latest project at Little Red Wagon for CHRISTMAS!!  

Have a wonderful Wednesday!

{{{{{HUGS}}}}}, Heather

Wednesday, December 10, 2014

Little Red Wagon Challenge #267 ~ So Flaky!!

Welcome to another Wednesday which brings a new challenge at Little Red Wagon.  Can you believe it is only two weeks until Christmas Eve?  I am sure most of you are so busy and are wondering how you will be able to fit it all in.  Our hostess for this week is JanR and her challenge is SO FLAKY! ~ use a snowflake (or two or a few) on your project.  This is an easy one to incorporate into some last minute Christmas cards or tags since snow usually is associated with Christmas too.  So join us for a challenge and get something off of your list done at the same time. :)

I made a very non-traditional snowflake card.  I do know that snow does not come in the lime green, fuchsia pink or baby blue variety but they sure look good on a card :)  And instead of a Christmas card this is just a cute little Winter card that can be used for lots of reasons.


RECIPE:
Card Stock ~ Recollections
Patterned Paper ~ Three Bugs in a Rug
Hampton Arts Snowflake Stamp and Die Set
Versamark Ink
Stampendous White Embossing Powder
Inside Sentiment ~ Michaels $1.50 Bin
Twine ~ Maya Arts
Ribbon, Button ~ Use It Up Inventory

Come participate with us this week at Little Red Wagon and show us your snow.  We don't have any outside here yet but one can only hope a bit shows up for Christmas.  I am looking forward to seeing what you create.

{{{{{HUGS}}}}}}, Heather

Wednesday, December 3, 2014

Little Red Wagon Challenge #266 ~ Things With Wings

Good Morning, my friends.  I think each week is flying by faster and faster.  It does not help that this was the busiest week of the year in the retail business so it flew by in a blur of shoppers.

 Anyhow.....it is Wednesday again....and that means time for a new challenge at Little Red Wagon.  This week our hostess is Joanne with her challenge entitled THINGS WITH WINGS.  Show us your creations containing something with wings.

Lots of things have wings....birds, butterflies, some insects, airplanes....but at this time of year I think of wings on angels.  As I looked through my stamps I found this little cutie from Kraftin' Kimmie and could not help but colour them up in traditional colours with lots of layers and embellishments alike.


RECIPE:
Copic Xpress It Card Stock
Memento Tuxedo Black Ink
Image and Sentiment ~ Kraftin' Kimmie Holiday Lulu and Libby
Copic Markers
Card Stock ~ Recollections
Patterned Paper ~ DCWV Tis The Season
Glitter Paper ~ American Crafts
EK Success Border Punch
Ribbon ~ Simplicity
Doily ~ Dollar Store
Felt Flowers ~ My Favorite Things Rolled Flower Die
Your Next Stamp Mini Branch Die
Bling ~ Recollections
Stickles ~ Xmas Red and Green
Stampendous Crystal Snow
Wink of Stella Clear

Here's a closer look at Lulu and Libby:


Copics Used:  Skin ~ E000, E00, E01, E11, E13, R20; Libby ~ (hair) E25, E29, E31, (clothes) G03, G05, G07; Lulu ~ (hair) E33, Y21, YR23, (clothes) R24, R29, R37, R59; Halos ~ YR23, YR24; Shoes ~ E42, E43, E44; Ground ~ W00, W1, W3, W5

So glad you could spend a little time with me today at this busy time of year.  I appreciate all of the visits and comments.  Join us this week at Little Red Wagon and show us your THINGS WITH WINGS.

{{{{{HUGS}}}}}, Heather

I would like to enter this card into the following challenge:
Kraftin' Kimmie Wonderful Wednesday ~ Anything Goes

Tuesday, December 2, 2014

PDE Linky Party Christmas ~ Tealight Card/Holder


Hello there, my friends.  Welcome to another fun time at PDE Linky Party.  This week our challenge is CHRISTMAS....easy, peasy, correct?  It is the time of year where most of our crafting has to do with Christmas.

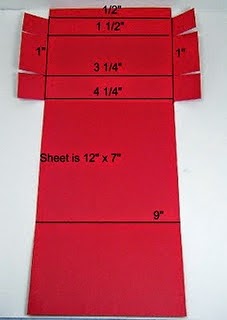
A while ago I had pinned a template for a card that holds tea lights.  It is a project that seems to have been around for a few years but I had not tried it before.  Here is the template that I followed in case you want to make one.  I wish I could give credit to whomever pinned it or where it came from but I am just getting a link that leads to nowhere.  


And here is my take on it:


RECIPE:
Card Stock ~ Recollections
Patterned Paper ~ MME Santa Claus
Tim Holtz Tea Dye Distress Ink
Stampin' Up Label Love Stamp Set
Stampin' Up Artisan Label Punch
Close to y Heart Cranberry Ink
Offray Ribbon
Recollections Pearls

I inked all the scored edges of the box before I put it together to give it a more vintage look.  I also added paper to the sides of the box where the tea lights are stored.  I believe I may make a few of these as they are fairly simple, fast and make a cute gift.  

Glad you could come by.  Have a great day and join us for our Christmas challenge at PDE Linky Party.  Can't wait to see all the great creativeness this week.

{{{{{HUGS}}}}}, Heather